Anypoint MQ Tutorial
This guide:
- Walks through creating user roles, a queue and an exchange.
- Describes publishing to a queue or exchange, and consuming from a queue.
- Using Anypoint Studio with the Anypoint MQ connector, and creating a client application
Prerequisites
- Read Understanding Anypoint MQ to familiarize yourself with the terminology and concepts of using MQ.
- Create an Anypoint Platform account to configure user permissions, register applications in MQ, and to create queues and exchanges.
- Subscribe to Mule ESB Enterprise - An Enterprise license is required to use the MQ server software.
- Install Anypoint Studio.
Tutorial Workflow
| # | Task | Description |
|---|---|---|
1
|
Use Anypoint Platform to:
| |
2
|
Use Anypoint Platform to register a client application and get values for the Client ID and Client Secret. Then in Anypoint Studio, get the MQ connector and create a flow for publishing or consuming messages, and run the Mule Application to ensure your application works and to serve HTTP requests at your localhost.
| |
3
|
Learn about:
|
Configure Anypoint Platform
In the sections that follow, we use Anypoint Platform to assign an administrative role, create an application, create a queue and exchange, and send and receive queue messages, and send messages to an exchange.
Assign User Permissions
You can use Anypoint Platform to assign user permissions to yourself for use with MQ. These permissions let you create client applications, and destinations by creating queues and exchanges. You can use this same information to assign user permissions for others in your organization.
To assign user permissions:
- Log into Anypoint Platform.
- Click the gear icon and Users:

- Click your username value:

- Click MQ and click the green box to set an environment and permissions:

- After you click the green box, the field changes to + Add an environment by name. Click the plus sign + and in the drop-down menu, click Production as shown in this composite illustration:

- Under Permission(s), click Select Access > Select All. When you click Select All,
Select Accesschanges to Manage destinations, Manage clients, (Total: 5) to show which which permissions you chose.
- Click the green checkmark to save your settings:
 A summary list appears:
 You can use this display to delete permissions if needed. For this tutorial, you can leave all as shown.
Queues
A queue provides a temporary stack for holding messages. Applications push messages to the queue and other applications consume the messages. In Anypoint MQ, you can read messages, return the messages for later viewing, or delete a message. By default, messages return to the waiting area so other applications can read them. Messages persist until the time to live (TTL) value expires—by default, a message persists in Anypoint MQ for 7 days.
Create a Queue
To create a queue:
- Log into Anypoint Platform.
- In the top task bar, click MQ.

- Click Destinations:

- As shown in the following animation, click the blue plus circle, click Queue, type
MyDemoQueuefor the queue ID, and click Save Changes. After the queue creates, the detail screen appears for the queue. If the details don’t appear, click the right side of the queue entry. Note: Where you click on a queue entry in the Destinations table governs what you see next:
How Do I Delete a Queue?
To delete a queue:
- Click Destinations.
- Click the right side of the queue entry in the Destinations table:

- Click the trash can symbol in the upper right.
- In the Delete Queue menu, click the checkbox:

- Click Delete Queue.
Send a Message to a Queue
To send a message to a queue:
- Log into Anypoint Platform.
- In the top task bar, click MQ.
- Click Destinations.
- Click the MyDemoQueue entry in Destinations to view details about the queue.
- Click the queue name in the details to open the Messaging feature:

- In the settings page, click Message Sender:

- Type text in the Payload such as
Hello Mules(leave the Type field set to Text):
- Click Send.
Verify the Message in a Queue
To verify that the message arrived in the queue:
- Click Destinations:

- Click the right side of the queue entry to view details and see the number of messages in the queue as shown in this animation:

Get a Message From a Queue
To get a message from a queue:
- Follow the directions in Send a Message to a Queue and advance to Step 6, except click Message Browser:

- Click Get Messages.

- Click the message ID value to view the message.

- If you want to return the message to the queue, such as if other applications may also want to read the message, click the Return Messages icon - this is the default condition. If you switch screens back to the Message Sender or to Destinations, messages automatically return to the queue. In Anypoint MQ, returning the messages to the queue is known as
nack- the message is not altered. However, the time to live (TTL) value you set when you created your queue determines how long the message is available before Anypoint MQ deletes it. Alternatively, you can delete the message by clicking the trash can icon. In Anypoint MQ, deleting a message is called an
ack:
Now you are able to send and receive messages in Anypoint MQ. In the next section, you can try alternate ways of formatting messages.
Send a CSV or JSON Message
To send a JSON message:
- Click Message Sender.
- Set the Type to JSON.
- Set the Payload to:
1 2 3 4 5
{ "animal that walks":"dog", "animal that swims":"fish", "animal that flies":"parrot" } - Click Message Browser and the message ID to view the message:

To send a CSV message:
- Click Message Sender.
- Set the Type to CSV.
- Set the Payload to:
"dog", "fish", "parrot" - Click Message Browser and the message ID to view the message.
Configure Anypoint Studio for MQ
In this section, we use Anypoint Studio to create a simple application that you can use to publish a message to a queue, or to consume the message, and to ack and nack the message.
In the next section, we return to Anypoint Platform and register an application that we can use in Studio.
Register a Client Application
The Anypoint MQ feature in Anypoint Platform lets you register a Client Applicationand get a client ID and a client secret that you plug into an application you create in Anypoint Studio. These credentials enable the MQ server to recognize your Studio application.
To register a client application:
- Log into Anypoint Platform.
- Click MQ in the top task bar:
- Click Client Apps:

- Click the blue plus + button:

- Specify an application name such as
DemoClientAppand click Save Changes.
Note: Leave the Client Apps window open. We need to copy and paste the Client ID and Client Secret into the configuration for Anypoint Studio in the next step.
Configure Studio for the Anypoint MQ Connector Plugin
To add the Anypoint MQ connector to Studio:
- In Studio, click the X in the upper left of Studio:

- In Anypoint Exchange, search for
anypoint mq:
- Click Install.
- Type your first and last name, email address, and telephone number. Click the checkbox to agree to the MuleSoft terms of service:

- Click Install.
- Follow the prompts to install the Anypoint MQ connector.
Use Studio to Create an Application
Note: If you want to create your application using XML or wish to check the XML as you go along, see XML Flow.
To create an application:
- Create a new Mule Project. Click File > New > Mule Project. Name the project "mqdemo".
- Search for "http" and drag the HTTP Connector to the Studio Canvas. Here’s how the Canvas appears after pulling all the building blocks to the Canvas:

- Search for "set" and drag Set Payload to the Canvas.
- Search for "mq" and drag the Anypoint MQ connector icon to the canvas.
- Search for "logger" and drag Logger to the Canvas.
- Click the HTTP Connector and click the green plus sign to the right ofConnector Configuration:

- In the HTTP Connector’s Global Element Properties, set the host to 0.0.0.0 and the port to 8081. Click OK.

- Set the Path to
/mq/{messageId}. - Click Set Payload in the Canvas and set the Value to:
#[message.inboundProperties.'http.uri.params'.messageId] - Click the Anypoint MQ connector, and click the green plus sign to the right ofConnector Configuration:
- In the MQ Connector’s Global Element Properties window, add the information from Anypoint Platform:

- Copy the Anypoint Platform’s Client App > Client App ID value to Studio’sClient ID field.
- Copy the Anypoint Platform’s Client App > Client Secret value to Studio’sClient Secret field.
- Ensure that Max Redelivery is set to -1 so that Anypoint MQ keeps retrying to deliver a message that is not delivered. The -1 value indicates that there is no limit to retries.
 For more information on other options and tabs, see Advanced Global Element Properties in Configuring MQ in Anypoint Studio.
 - Click OK.
- Click the Operation field and specify the
publishoperation.
- Specify the Destination as
MyDemoQueuethat you set in Anypoint Platform:
- Click the Logger and set the Message field to:MQ Message: #[payload]

- Save your project.
XML Flow
After you configure your application using the MQ Connector, you can check your configuration against this XML:
1
2
3
4
5
6
7
8
9
10
11
12
13
14
15
16
17
18
19
20

<?xml version="1.0" encoding="UTF-8"?>

<mule xmlns:anypoint-mq="http://www.mulesoft.org/schema/mule/anypoint-mq" xmlns:http="http://www.mulesoft.org/schema/mule/http" xmlns="http://www.mulesoft.org/schema/mule/core" xmlns:doc="http://www.mulesoft.org/schema/mule/documentation"
        xmlns:spring="http://www.springframework.org/schema/beans"
        xmlns:xsi="http://www.w3.org/2001/XMLSchema-instance"
        xsi:schemaLocation="http://www.springframework.org/schema/beans http://www.springframework.org/schema/beans/spring-beans-current.xsd
http://www.mulesoft.org/schema/mule/core http://www.mulesoft.org/schema/mule/core/current/mule.xsd
http://www.mulesoft.org/schema/mule/http http://www.mulesoft.org/schema/mule/http/current/mule-http.xsd
http://www.mulesoft.org/schema/mule/anypoint-mq http://www.mulesoft.org/schema/mule/anypoint-mq/current/mule-anypoint-mq.xsd">
    <http:listener-config name="HTTP_Listener_Configuration" host="0.0.0.0" port="8081" doc:name="HTTP Listener Configuration"/>
    <anypoint-mq:config name="Anypoint_MQ_Configuration" doc:name="Anypoint MQ Configuration">
        <anypoint-mq:provider url="https://mq-us-east-1.anypoint.mulesoft.com/api/v1" clientId="<client_ID_value>" clientSecret="<client_secret-value>"/>
    </anypoint-mq:config>
    <flow name="mqdemoFlow">
        <http:listener config-ref="HTTP_Listener_Configuration" path="/mq/{messageId}" doc:name="HTTP"/>
        <set-payload value="#[message.inboundProperties.'http.uri.params'.messageId]" doc:name="Set Payload"/>
        <anypoint-mq:publish config-ref="Anypoint_MQ_Configuration" doc:name="Anypoint MQ" destination="MyDemoQueue"/>
        <logger message="MQ Message = #[payload]" level="INFO" doc:name="Logger"/>
    </flow>
</mule>
Run the Studio Application
In Anypoint Studio, click the project name in Package Explorer, and click Run > Run As > Mule Application.
The output should end with these statements:
1
2
3
4
5
6
7
8
9
10
11
12
13
14
15
16
17
18
19

++++++++++++++++++++++++++++++++++++++++++++++++++++++++++++
+ Started app 'mqdemo'                                     +
++++++++++++++++++++++++++++++++++++++++++++++++++++++++++++
INFO  <date_and_time> [main] org.mule.module.launcher.DeploymentDirectoryWatcher:
++++++++++++++++++++++++++++++++++++++++++++++++++++++++++++
+ Mule is up and kicking (every 5000ms)                    +
++++++++++++++++++++++++++++++++++++++++++++++++++++++++++++
INFO  <date_and_time> [main] org.mule.module.launcher.StartupSummaryDeploymentListener:
**********************************************************************
*              - - + DOMAIN + - -               * - - + STATUS + - - *
**********************************************************************
* default                                       * DEPLOYED           *
**********************************************************************

*******************************************************************************************************
*            - - + APPLICATION + - -            *       - - + DOMAIN + - -       * - - + STATUS + - - *
*******************************************************************************************************
* mqdemo                                        * default                        * DEPLOYED           *
*******************************************************************************************************
Test Your Application
Get a REST plugin for your browser so that you can send POST requests. Typical software:
The following is an example setup using Postman:

To set up Postman for a REST POST:
- Specify the URL to send the message as
0.0.0.0:8081/mq/Hello. You can also specify messages with spaces such as,0.0.0.0:8081/mq/My What A Great Message. - Click POST in the drop-down options menu.
- Click Send to post the message. You can send more than one message if you prefer.
- View the resulting reply from the Anypoint Studio web server.
Viewing Your Message in Anypoint MQ
To view your message:
- Switch back to Anypoint Platform, and if needed, log in and click MQ in the task bar at the top of the screen.
- Click Destinations.
- Click
MyDemoQueueat the right side to view the number of messages in the queue: You can see the number of messages in the queue. Having verified that you have messages, we can now view them.
 - Click
MyDemoQueueat the start of the entry to view the Queue Settings, Message Sender, and Message Browser.
- Click Message Browser and click Get Messages:
- Click a message ID and view the message to the right.

You can repeat this process by returning to your REST POST application and sending and viewing more messages. In the next section, we build on your knowledge, first with an administrative task of creating user roles and then creating and testing exchanges, which let you send one message to multiple queues.
Advanced MQ - Roles and Exchanges
Now that you can send and receive messages, you can learn how to use the additional features Anypoint MQ provides.
- Create an Admin Role - Explains how to create roles to assign access permissions to Anypoint MQ.
- Exchanges - Explains how you can use exchanges to send one message to multiple queues.
Create an Admin Role
You can create a role that you can apply to other users in your organization. While you don’t need roles to complete this tutorial, when you use MQ as an administrator or developer, you should create roles for all those in your organization who use MQ. After the previous section where you assigned permissions to yourself, the steps to create a role are very similar and this exercise takes little extra time now and benefits you later.
Creating a role lets you assign access rights to users in your organization, such as for administrators, developers, or for those who only view information but don’t change it.
In this tutorial, we grant all permissions to the
MQ Admin role. When you create other roles for your organization, you can change the permissions as required.
To assign role permissions:
- Log into Anypoint Platform.
- Click the gear icon and Roles:

- Click Add role.

- Specify an administrator’s role for those who create client apps, queues, and exchanges.
- Click Add role.
- Click the Role name and click MQ.
- Click the green bar, click the plus sign for Add an environment by name, and choose the Production environment.

- Click Permission(s) > Select Access > Select All. When you click Select All, Select Access, changes to Manage destinations, Manage clients, (Total: 5):

- Click the green checkmark on the right to save your changes:
Exchanges
The sections that follow help you work with Anypoint MQ Exchanges. An exchange consists of a collection of one or more queues. Exchanges help you organize queues and send one message to all its bound queues. You can still send and receive messages from a bound queue, but the exchange ensures all queues get the same message.
Create an Exchange
To create an exchange:
- Log into Anypoint Platform.
- In the top task bar, click MQ.
- Click Destinations.
- Click the blue plus circle.
- Click Exchange.

- Specify the name
MyDemoExchange. - Click the checkbox to bind MyDemoQueue to this exchange.
- Click Save Changes.
- In the Destinations screen. click the exchange Type to list its details.
Bind a Queue to an Exchange
To bind a queue to an exchange:
- Log into Anypoint Platform.
- In the top task bar, click MQ.
- Click Destinations.
- Click the left side of the exchange entry in Destinations.Note: Where you click on an exchange entry in the Destinations table governs what you see next:

- In the Exchange menu, click Bind for each queue you want to bind to the exchange:

How Do I Delete an Exchange?
To delete an exchange:
- Click Destinations.
- Click the right side of the exchange entry in the Destinations table:

- Click the trash can symbol in the upper right.
- In the Delete Exchange menu, click the checkbox:

- Click Delete Exchange.
Send a Message to an Exchange
Sending a message to an exchange is very similar to sending a message to a queue. The only difference is that you can get the message from any queue bound to an exchange.
To send a message to an exchange:
- Log into Anypoint Platform.
- In the top task bar, click MQ.
- Click Destinations.
- Click the
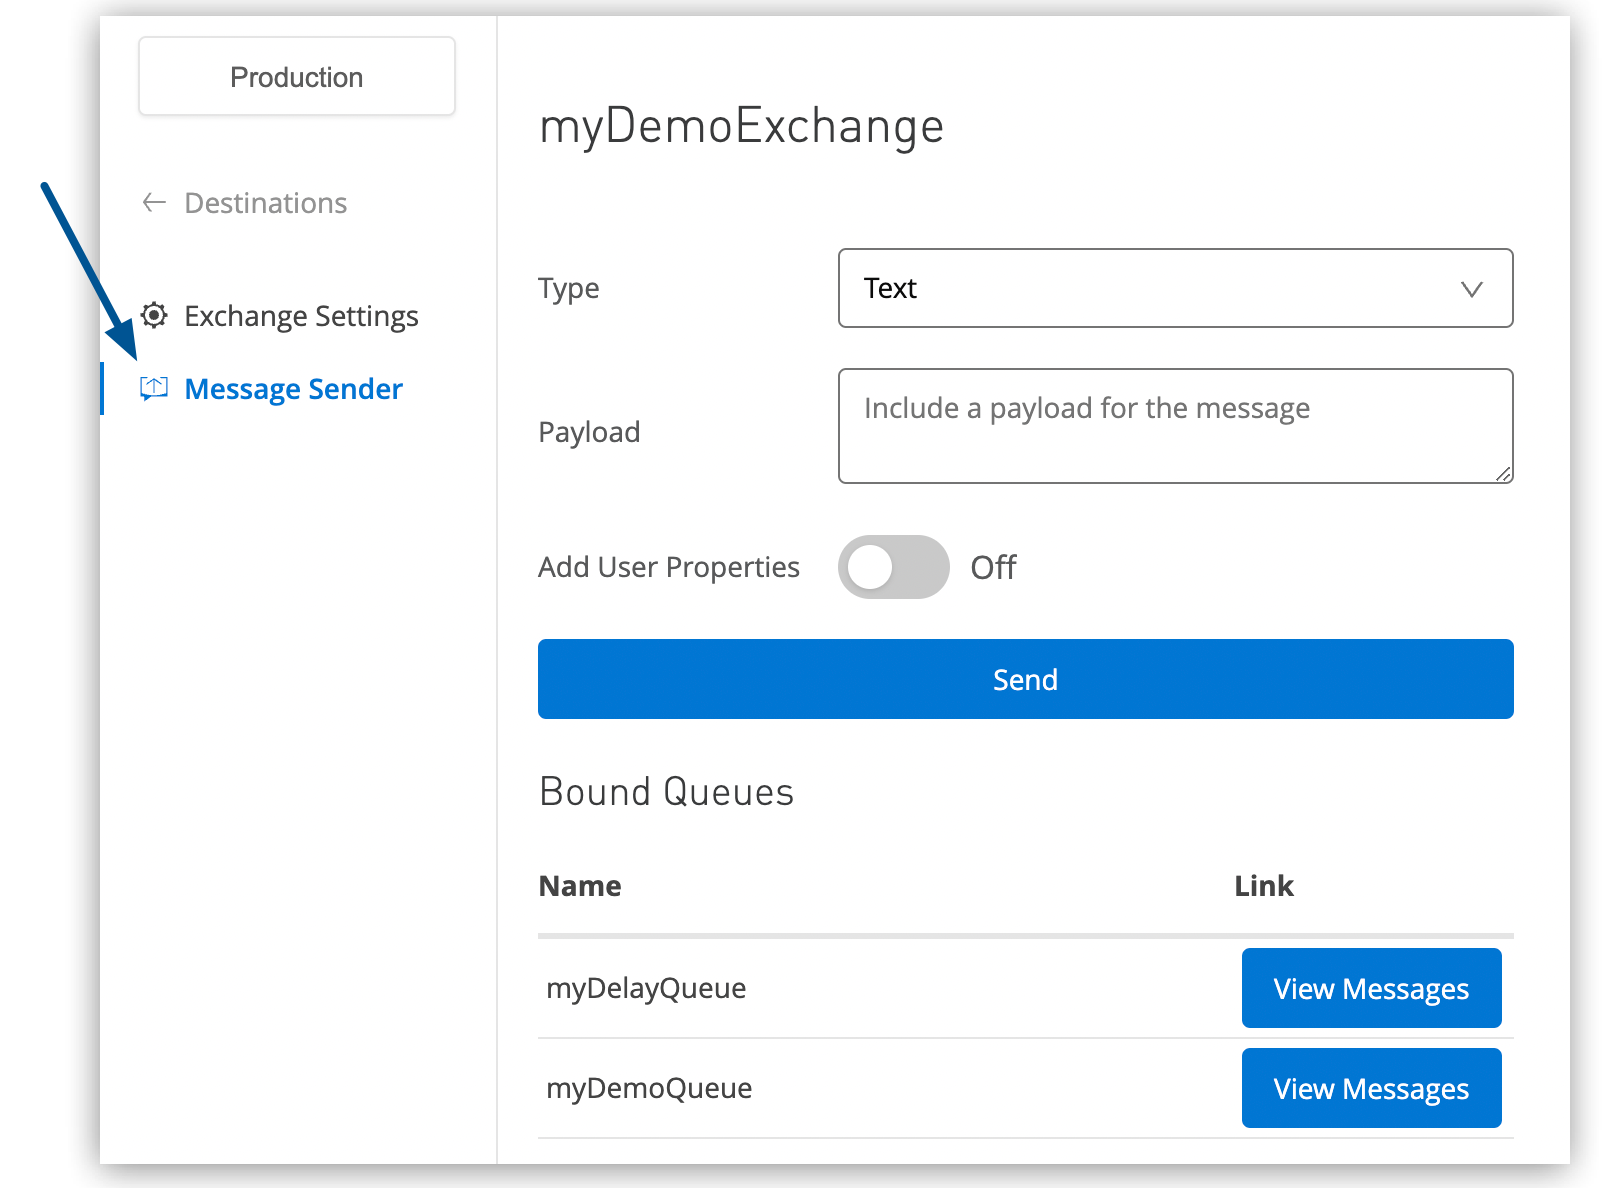
MyDemoExchangeentry in Destinations to view details about the exchange. - Click the MyDemoExchange link in the details screen to access the Message Sender:

- Click Message Sender:

- Type the contents of the Payload and click Send:
You can now use the Message Browser to get the message from the MyDemoQueue as described in Get a Message From a Queue.
You can also send comma-separated value (CSV) or JSON content in the payload by changing the message Type value. For more information, see Send a CSV or JSON Message.
the blog is good and Interactive it is about Mulesoft Anypoint Studio it is useful for students and Mulesoft Developers for more updates on Mulesoft mulesoft Online training bangalore
Trả lờiXóaThanks for posting this article.Keep on sharing.
Trả lờiXóaMulesoft Online Training
Mulesoft Training in Hyderabad
Nice and good article. It is very useful for me to learn and understand easily. Thanks for sharing your valuable information and time. Please keep updating mulesoft training
Trả lờiXóaReally a awesome blog for the freshers. Thanks for posting the information.mulesoft training in bangalore
Trả lờiXóaThanks for sharing such an useful and informative stuff...
Trả lờiXóamule training
Nice article!!
Trả lờiXóaMulesoft Online Training india
Mulesoft Online Training in Hyderabad
I really enjoy the blog article.Much thanks again.
Trả lờiXóaMuleSoft online course
MuleSoft onlinetraining from india